

Table of contents
1. Play and record your audio2. Submit and register audio
3. Check sample file
4. Purchase your repaired audio
1. Play and record your audio
You play your records with your own equipment, which ensures you will receive the same audio quality you are used to. Making a digital copy of your analog audio records requires some preparation which is explained in this work flow document. The better you prepare, the better the results will be. Although we guarantee great results in cleaning and repairing your audio with minimal impact to the audio itself, it is still important to create a digital copy with the best possible recording quality to allow for the best possible end result.
Requirements to record analog audio:
clean your records
a high quality record player
a high quality stylus
analog to digital conversion
a desktop computer or laptop to run the recording software
I. Prepare your records (LPs and singles)
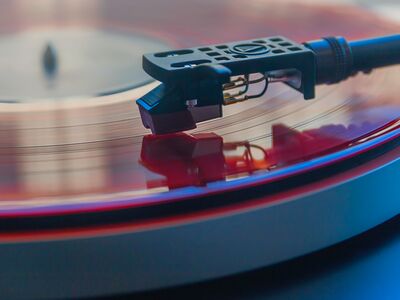
Make sure you have a decent stylus installed in your turntable. If you thought about changing or upgrading the stylus now would be the time to do that.
Decide which vinyl records you want to play and record to computer. Check the record's surface for dust, dirt, scratches, finger prints, etc.
Clean your vinyl. If you have no experience in cleaning read "How to clean vinyl records", which includes (almost) everything you need to know about cleaning vinyl records. Note that we are not affiliated with, or benefit from, Turntable Kitchen and this article in any way. There are many other guides available in the internet which you should have no difficulties to find.
II. Setup your recording station
You need to connect your turntable to your computer to be able to record from it. There are many different USB turntables available on the market, and if you own one you're almost ready to go. If you don't, don't worry, just get yourself a phono pre-amplifyer with USB output. There are many different models available, make sure it has a phono input available, and connects to your computer through USB. Our recommended choice for a budget phono pre-amplifier is the NAD PP 4, which allows sending audio to your amplifier and your computer at the same time.
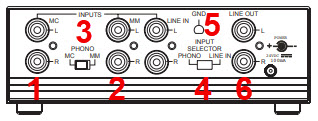 How to connect is explained with the PP4 as an example, other USB pre-amplifiers would be connected in a similar way:
Connect the turntable RCA cable to input 1 for a Moving Coil stylus, or input 2 for a Moving Magnet stylus. If you don't know what the difference is you most likely have a Moving Magnet stylus. Set the input selector 3 to MC (Moving Coil) or MM (Moving Magnet).
Connect the ground wire from your turntable to connector 5. This avoids an earth loop and the earth humming sound.
Connect the line output 6 to the receiver and set the input selector 4 to phono.
On the other side of the device which is not visible in the image connect the USB connector to your desktop computer or laptop.
On your desktop computer or laptop:
Download and install Audacity, which is a free, open source, cross-platform audio software.
III. Play and record your audio
Now that you have made all preparations you are ready to record your audio:
Prepare your record on your turntable.
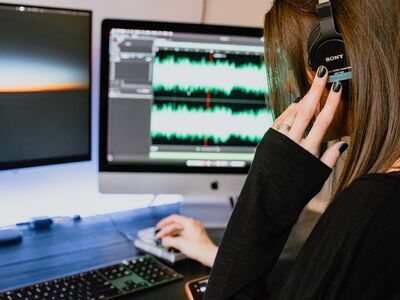
Open Audacity on your computer and set the recording input to your USB connected turntable or pre-amplifier, which is likely called "USB Audio CODEC". Do also check that the recording channels are set to "Stereo".
Click the Pause and Record button, then play several parts on the record to adjust the recording level. You need to make sure that the peak level remains within -6 to -3 dB, but never exceeds 0 dB, as this would result in clipping of the recorded audio. Recording levels can be adjusted mechanically at the turntable or pre-amplifier, or through software in Audacity.
Play the first side of the record. When finished, click the Stop button in Audacity and select File > Save Project in the menu, which saves the recording as Audacity file.
Repeat above steps for the second side of the record.
Check the result. Make sure the entire length has been recorded, that you did not start too late or stop too early. You might also want to listen to the result, which you can do from within Audacity by clicking the Play button.
 Step 2 - Submit and register audio
I. Register on our website
To be able to submit and register audio you first need to register on our website. The sign up steps required to register an account and set up 2-factor-authentication are explained in Register on our website (click the link). Find out more about this requirement in the FAQ section.
II. Submit audio
Once you have decided to try our service you will need to give us something to work with. Please first go to Submit Audio to upload your recordings, then tell us about it in the next step.
Acceptable file formats for the uploads are Audacity3 files, Waveform audio files or Lossless Audio encoded files, with file extensions .aup3, .wav, .flac, or .alac.
Compressing your audio with 7-Zip or a similar compression tool is recommended if you opt for Audacity3 format files, as the compressed file would be 2-3 times smaller. Compressed file extensions should be .7z, .zip, or .gz. 7-Zip is available for Windows, Mac, and Linux.
First select you desired Server Location where to keep your uploaded files and from where to download the repaired files. All servers are owned and managed by Bethico, and your uploaded files will only be stored in the location selected.
Now select Add files and select your recordings. You can select all files at the same time, then hit Upload to start the file upload. The required time to upload depends on the file size and the upload speed of your internet connection. A typical 250 MB size file will take 4 minutes to upload on a 10 Mbps upload speed connection, but many internet service providers in Europe still throttle the upload speeds to below 10 Mbps, in which case the upload will require more time.
Make sure that files uploaded have different file names. We recommend a naming scheme to easily identify the recordings: {artist name} - {recording name} - {LP side number}, for example "Beatles - The White Album - side1.7z".
Once all files are uploaded you will find them listed on the upload page.
III. Register audio
Now that your recordings have been uploaded to our server you will need to let us know, and give us some further information. Click Register Audio in the menu and fill out the contact form. This menu entry is available only after you have logged in to our site.
All fields are mandatory. To obtain help hints on any of the fields click the Register button at the bottom of the form before filling out fields. Further information is available in our Frequently Asked Questions section.
Artist & LP: artist and album name.
File Names: enter the file names of the uploaded files, one per line. If you can't remember the exact file name, first go back to the Submit Audio page and click the icon to the left of the file name, which copies the name to your clipboard. You can then paste it directly into the File Names field.
Repair clicks and crackles: select if you want all clicks and crackles removed.
Repair scratches: select if you need scratches removed. Please indicate in the remarks field whether there is just one scratch, a few, or many, and where they are located in the recording, so we do not accidentally overlook these. Also, we will need to pay special attention to scratch removal and inform you prior to the restauration process whether the removal will have any cost implication.
Repair sibilance: select to repair sharp "hiss" sounds in the vocals of your recordings. Please indicate in the remarks field the approximate locations or song titles or numbers where you noticed sibilance which you want us to reduce. Sibilance can not be removed, but it is possible to reduce it's disturbing sounds.
Create MP3 audio files: select to have MP3 audio files generated from your recordings, with full meta data tagging.
Create lossless FLAC audio files: select to have lossless FLAC audio files generated from your recordings, with full meta data tagging. Please note that while we are able to read Apple Lossless Audio Codec files we are not able to create the repaired audio in this format.
Name or number of song to receive free of charge: we will send you one song from your recordings in MP3 format free of charge before you need to make the decision to place an order with us. If you don't like the result you don't need to do anything, we will cancel your request, and remove the files 30 days after they have been uploaded.
Remarks: please give us as much information as possible about your recordings. It will make our job easier and improve the result to meet your expectation.
Send me a copy of the email: This option is preselected to receive a copy of your order. If you discover an error in the order or want to make a change, please contact us immediately. Please understand that orders can no longer be changed if we have already carried out the repair following your request.
In addition to these fields your registered name, username, and email address will be added to the message.
Your current IP address will also be recorded when sending us a message through the contact form. We use this with the sole purpose of detecting abuse of our website and will never use any of your private information for anything else than contacting you during the course of repairing your audio. Please also visit our Privacy Policy page on how we use and protect your data.
 Step 3 - Check sample file
After you have submitted your recordings and registered it through our contact form we will repair your audio. This will normally take not more than 24 hours, after which we will make one song available for you to download and check whether you are happy with the results. Please note the following:
We will provide you with the song you requested when you registered your audio.
You will be able download a file which will not work by itself. You will be able to create the repaired song by combining the downloaded file with your recorded file. The file to download will appear in your file list where you uploaded your recordings before, named after the song with file extension "btc".
Download this btc file either by clicking Download or by clicking on the file name.
After the download has finished you need to click Create to create the repaired song. After click you are presented with the Create your audio files dialog.
First open the file you just downloaded, after which the song file name will appear in the box next to line 3 of the dialog window. Second, open the audio recording where this song is part of, which will initiate creation of the the repaired song. Third, click on the song file name to save the repaired file to your download folder. You need to follow these 3 steps in sequence.

Enjoy listening to your repaired song.
Please note that we will not offer to repair another song for free from the same album. If you like the result and want other songs or the complete album to be repaired you need to purchase one of our album repair options. You find the price list through a link in the next chapter of this workflow.
 Step 4 - Purchase your repaired audio
You need to place an order to repair all songs of your audio recording. Please refer to the Price list for options. Please consider the following to obtain your repaired audio:
You will receive an email from us when the free song is available as a link in your upload area (please note that this is not a download link for the repaired song, it is a download link for a file with which the repaired song can be created).
This email will contain payment instructions should you chose to purchase the repair of your audio recording.
After payment kindly send us an email with confirmation details of your payment, after which you will receive a link for your repaired audio recording in your upload area (please note that this is not a download link for the repaired audio, it is a download link for a file with which the repaired audio can be created).
We will keep your uploaded audio and the repaired audio on our servers for 30 days. During this time you may request to redo the repair one time for free should you not be fully satisfied with the result. For example, if you wish to have more or less of the recorded irregularities repaired you can ask us to do so, as the level of repair is always a trade off between removing irregularities and preserving the best possible audio quality of the original material.
If you do not request a repair within 30 days your recorded audio and the repaired audio is removed from our servers.
If you require more than one redo repair we will let you know if there is any additional cost involved.
Please consult the "Frequently Asked Questions" section for further details.